







This article elaborates on design and calculation of Boost DC/DC converters. The post is based on Würth Elektronik‘s “DC/DC Converter Handbook” that can be ordered from WE website here. Published under permission from Würth Elektronik.
Key Takeaways
- Boost Converter Design focuses on creating a higher output voltage than the input voltage using specific topologies and components.
- The article discusses design considerations, including EMC implications and current ripple management in boost converters.
- Calculations for component selection, such as inductors and capacitors, aim to meet performance criteria like ripple voltage and current ratings.
- Designing input and output filters follows established principles to optimize converter performance and minimize interference.
- Basic formulas related to boost converters are provided, highlighting essential calculations for efficiency and component sizing.
Boost Converter Block Diagram and General Thoughts
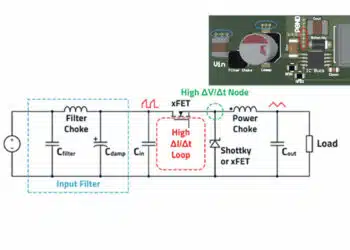
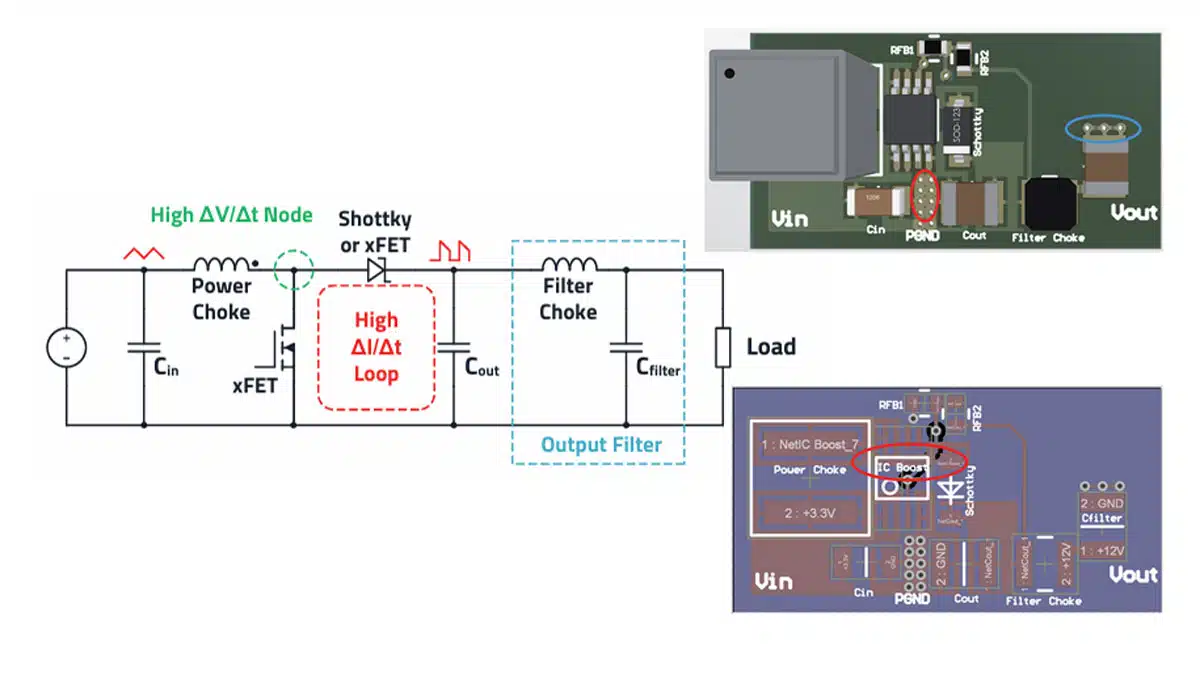
The boost converter (step-up converter) is used when the output voltage must be higher than the input voltage. As apparent from Figure 1., the inductor is in the input circuit, which means that this topology has no discontinuous input current. You can see an overview of basic power converters in the article DC-DC Converter Basic Characteristics and Formulas.
Because the storage inductor integrates the current over time, it has an almost triangular waveform, but this does not mean that the input side of the converter can be ignored in terms of EMC interference. The necessary input filters can therefore often be dimensioned slightly smaller than with the buck converter, for example. On the output side, a discontinuous, trapezoidal current flows in the boost converter.
It is apparent that the output side of the boost converter is more important from an EMC perspective than with the buck converter topology. The diode commutates hard on the output capacitor to which a discontinuous current is therefore superimposed. Depending on the application, the resulting RF voltage as well as the low-frequency voltage ripple can interfere with the downstream electronics or is radiated as high-frequency interference. This means a downstream output filter may become necessary.
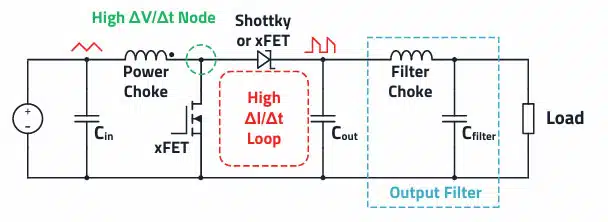
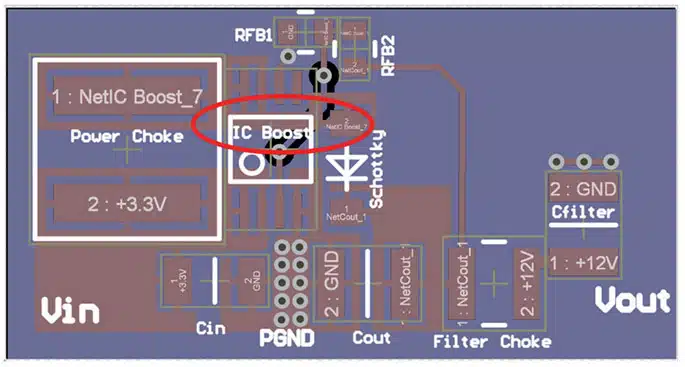
From Figure 1. it is apparent that the boost converter, like the buck converter, has a critical current loop with a high ΔI/Δt. This current loop is a potential source of differential-mode interference. Likewise, the boost converter has a “hot node” with a high ΔV/Δt that is a source of common-mode interference. The layout rules are therefore the same as for the buck converter.
To put this EMC contrast on a common basis, here’s how buck and boost topologies compare in dominant passive-component stress:
| Topology | Typical Power Range | Dominant Passive Components | Primary Passive Concerns |
|---|---|---|---|
| Buck | <1 W – 10 kW | Storage inductor, output capacitors | Inductor saturation and loss; C_out ripple and impedance shape |
| Boost | <1 W – kW | Output capacitor, inductor, snubber network | High C_out RMS current; inductor thermal limits; EMI |
Source: Passive Components for Power Converters Dossier, Passive Components Blog.
The GND pads of the input capacitor, the output capacitor, as well as the controller IC (with external low side FET, the source connection), must meet at a single point on the board. This keeps the parasitic current loop (H-field loop antenna) as small as possible.
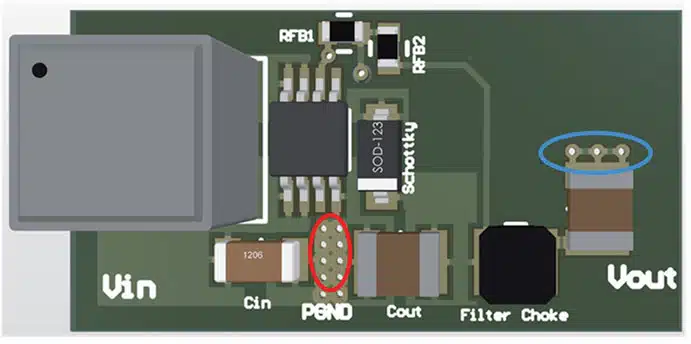
As with the buck topology, the GND of the optional filter capacitor should be slightly further away at the output to have the quietest possible filter GND reference.
To keep undesirable output voltage fluctuations low, the feedback resistor network should also be placed close to the regulator. The possibly very long feedback trace therefore has a low impedance and is less sensitive to interference. The output voltage for regulation should be tapped at a point as close to the output capacitor as possible.
Boost converter operating modes
The design example and basic equations in this article assume continuous conduction mode (CCM), where the inductor current never falls to zero within a switching period. CCM is typical for medium to higher load currents because it minimizes peak currents and reduces conduction losses.
At light load, many controllers allow or force operation in discontinuous conduction mode (DCM), where the inductor current falls to zero before the next on‑time. In DCM, the duty cycle–voltage relationship and inductor current waveforms differ from CCM, and peak currents can become significantly higher for the same average load current.
Designers should therefore check whether their specific controller operates purely in CCM, transitions to DCM at light load, or uses a burst‑mode scheme, and then verify that the chosen inductor and capacitors can handle the associated peak and RMS currents across the entire load range. For high‑power applications or strict EMI requirements, a pure‑CCM design is often preferred, while for battery‑powered systems a CCM/DCM controller can improve light‑load efficiency.
Example Boost Converter Design and Calculation
storage inductor (double) for a sepic converter
Input voltage: Vin = 5 V nominal
Output voltage: Vout = 12 V
Output current: Iout = 0.5 A max.
Switching frequency: fsw = 500 kHz
Max. bandwidth control loop/crossover frequency: fc = 10 kHz
Forward voltage rectifier diode: VD = 0.4 V
Ripple current factor:
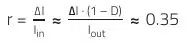
Duty cycle D:

Minimum inductance necessary to maintain the ripple current factor:
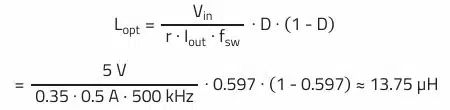
Considering a standard inductance value of 15 µH, this results in a ripple current of:

Rated Current Ir:
Often it is sufficient to select the rated current based on the average inductor current (output current at the buck converter) with some margin. In fact, the RMS value of the inductor current (average inductor current + AC ripple current) is responsible for the heat generated at the DC resistor (see RMS chapter in Selection of Storage Inductors for DC/DC Converters).
The input current is estimated here using the output power and the diode conduction losses. As this simplification results in additional errors, e.g., the influence of switching losses on the input current is neglected, the rated current margin for the boost converter should be larger than for the buck converter.

A choke with more than 1.24 A rated current (according to data sheet) should be selected.
Saturation Current Isat:
Half the AC ripple current must be added to the average inductor current to determine the maximum peak current. The average inductor current of the boost converter corresponds to the input current.

You can now select a suitable storage choke based on these results. Some safety margin should also be included, as component tolerance, the actual efficiency and ambient temperature have been not considered here. For this example, an experienced designer selects an inductor with at least 15 µH according to the datasheet, as well as 1.5 A rated current and 1.8 A saturation current.
The fastest and easiest way to get there is to use the REDEXPERT inductor simulation tool.
Loss mechanisms and efficiency
The previous calculations for the inductor and currents are based on an idealized model that neglects switching and conduction losses. In a real boost converter, the main loss contributors are the MOSFET conduction and switching losses, diode forward losses (or synchronous rectifier losses), inductor copper and core losses, and capacitor ESR losses.
As a first approximation, the converter efficiency can be estimated by comparing the calculated input and output power, then subtracting diode forward power loss PD=ID,avg⋅VD and MOSFET conduction loss PFET≈I2FET,rms⋅RDS(on).
For the 5 V to 12 V, 0.5 A example, the diode and MOSFET together often account for a large share of the total loss, so replacing the diode with a synchronous rectifier and choosing a MOSFET with low RDS(on), can significantly improve efficiency. Tools like REDEXPERT help quantify inductor core and copper losses, while many controller vendors provide loss estimation spreadsheets for their devices. After completing the basic sizing, it is good practice to check worst‑case efficiency at minimum and maximum input voltage, maximum load, and elevated ambient temperature to ensure the thermal design remains within safe limits.
Diode and MOSFET selection guidelines
The sample design assumes an asynchronous boost converter with a diode that has a forward voltage of 0.4 V. For low‑to‑medium output currents and moderate output voltages this is often sufficient, but at higher power levels the diode forward loss can become a dominant loss term.
When efficiency is critical, a synchronous boost converter with a second MOSFET replacing the diode can reduce conduction loss and improve light‑load behavior. In this case, the designer must pay particular attention to MOSFET body diode behavior, shoot‑through prevention, and the controller’s gate‑drive strategy.
For asynchronous designs, Schottky diodes are commonly used thanks to their low forward voltage and fast recovery; for higher voltage levels, ultrafast or SiC diodes may be required. When selecting the switching MOSFET, key parameters include RDS(on), gate charge, voltage rating with sufficient margin over the maximum output voltage, and package thermal resistance.
Input Capacitor for a Boost Converter
RMS current (ripple current) through the input capacitor:
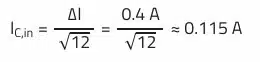
With the help of the REDEXPERT tool, a capacitor can now be selected with the lowest possible impedance at the switching frequency of 500 kHz, which at the same time meets the requirements in terms of ripple current as well as voltage.
Output Capacitor for a Boost Converter
The output capacitor is defined based on the maximum permissible voltage ripple and based on the maximum permissible voltage change (Vdroop) resulting from a load step. In our example we want to have a voltage ripple of maximum 1% (120 mV) at an output voltage of 12 V. Furthermore, the voltage change should not exceed 3% (360 mV) for a load step from 0.1 A to 0.5 A (Istep = 0.4 A).
From these assumptions, the minimum necessary capacitance can be calculated, which fulfills both requirements. For the output voltage residual ripple, in addition to the capacitance-dependent part, the influence of the ESR is considered (the ESL is neglected). For simplicity, an even split is assumed for the two components, resulting in 60 mV each for the capacitance and the ESR calculations. With the boost converter, the extent to which this addition actually occurs, depends on the duty cycle and the magnitude of the ripple current.
In addition, it must be checked mathematically whether the AC current through the output capacitor stays below the maximum ripple current according to the datasheet. The following equation describes the relationship between the output capacitance and the ripple voltage for a boost converter topology (assumption: ideal capacitor):
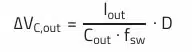
The next equation is used to calculate the minimum capacitance required for the given capacitance dependent ripple:

For the boost converter topology, the additional calculation is needed to calculate the average current amplitude of the output capacitor current:
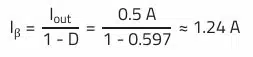
The next equation describes the relationship between the ESR of the output capacitor and the ripple voltage for a boost converter topology (assumption: ESL is neglected):
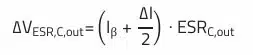
This equation is used to calculate the maximum allowable ESR of the output capacitor based on the given ESR-dependent ripple voltage:

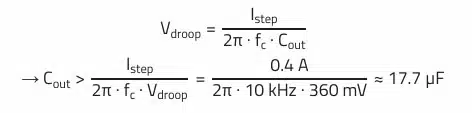
This equation is used to calculate the minimum output capacitance to maintain a given voltage droop during a load step:
The next equation is used to determine the RMS current that flows through the output capacitor of the boost converter:

The capacitance of 9.95 µF for the maximum defined voltage ripple is not relevant in this case, as the minimum necessary capacitance of 17.7 µF results from the maximum allowed voltage change during load transients.
Based on the results, we therefore need a capacitor with at least 22 µF (default value) and an ESR lower than 41.7 mΩ at 500 kHz.
A V-chip aluminum polymer SMT capacitor, such as the WCAP-PSLP (875105359003), would be a suitable choice for this purpose. This offers a stable capacitance of 22 µF in a very small package (5.3 · 5.3 · 5.8 mm³), a 16.3 mΩ ESR at 500 kHz and is specified for a ripple current of up to 2.2 A.
| Parameter | Value / Note |
|---|---|
| Input voltage Vin | 5 V nominal |
| Output voltage Vout | 12 V |
| Max output current Iout | 0.5 A |
| Switching frequency fsw | 500 kHz |
| Inductance L | 15 µH (standard value) |
| Inductor rated current Ir | ≥ 1.5 A (datasheet), margin over 1.24 A minimum |
| Inductor saturation current | ≥ 1.8 A |
| Output capacitance Cout | 22 µF (minimum 17.7 µF calculated) |
| Max ESR at 500 kHz | < 41.7 mΩ |
| Example Cout part | WCAP‑PSLP 875105359003 (22 µF, 16.3 mΩ, 2.2 A) |
| Target ripple (12 V output) | ≤ 1% (120 mV) steady‑state, ≤ 3% (360 mV) droop |
Design of the input and output filters for a boost converter
Protections and practical operating limits
In addition to correct component sizing and filtering, a robust boost converter design requires appropriate protection functions. Typical features include overcurrent protection (OCP), overvoltage protection (OVP), soft‑start, and thermal shutdown implemented either in the controller IC or at system level. Because the duty cycle of a boost converter approaches 1 as the output‑to‑input voltage ratio increases, designers must ensure that the controller’s minimum on‑time and maximum duty‑cycle limits are compatible with the desired operating range. Otherwise, regulation may be lost at low input voltage or light load.
Soft‑start and inrush‑current limiting help avoid excessive stress on the input source and components during startup. For applications with strict reliability requirements, it is also recommended to consider fault cases such as output short circuits, reverse polarity at the input, and open‑load conditions, and verify that the converter either shuts down safely or operates within defined limits in each scenario.
Design is carried out according to the same principle as explained above in the Example Buck Converter Design and Calculation.
Read also the related articles in this series:
For a broader, application-driven view of how this passive-stress pattern extends to SEPIC, flyback, LLC and other topologies across automotive, AI data-center, industrial and renewable systems, see our Passive Components for Power Converters Dossier.
- Selection of Capacitors for DC/DC Converters
- Selection of Storage Inductors for DC/DC Converters
- Input filters for DC/DC converters
- Switching vs Linear Power Converters Compared
- Buck Converter Design and Calculation
- SEPIC Converter Design and Calculation
- Flyback Converter Design and Calculation
- Fly-Buck Converter Explained and Comparison to Flyback
- LLC Resonant Converter Design and Calculation
Buck and Boost Converter Basic Formulas
The following table 1. provides basic formulas of the buck and boost converter topologies. All equations in Table 1 assume ideal components and continuous conduction mode (CCM) unless otherwise noted. For operation in discontinuous conduction mode (DCM), the voltage transfer function and current waveforms differ and must be recalculated accordingly.
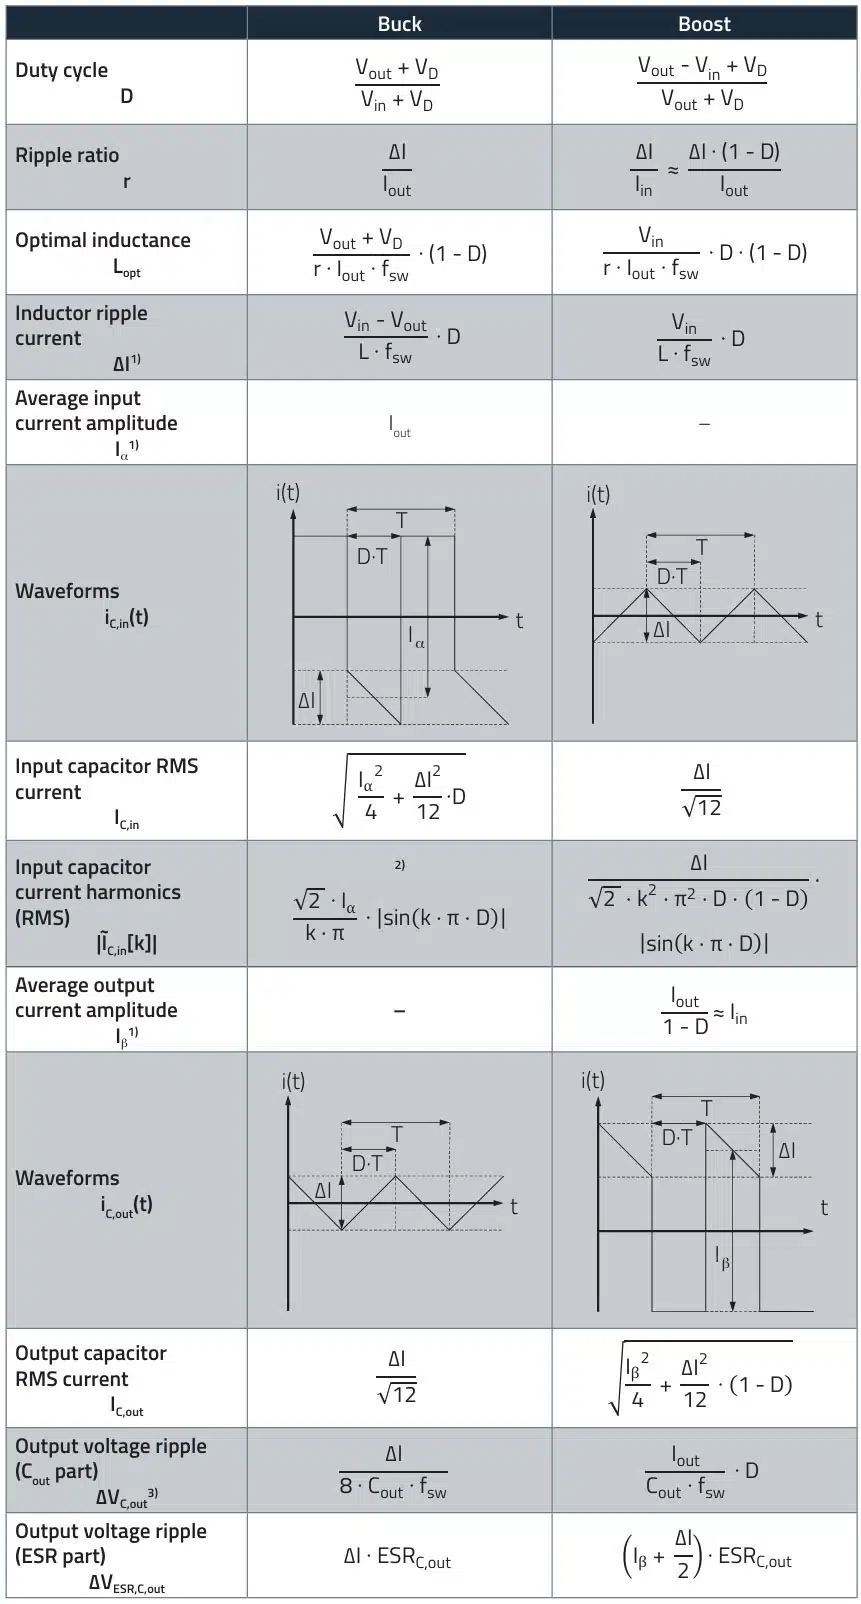
1) These assumptions apply to the ideal switching regulator in continuous conduction mode
(CCM), i.e., the efficiency of the converter is assumed to be 100% (η = 1).
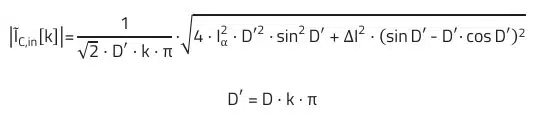
2) The current curve from this equation is approximately rectangular (ΔI neglected). Exactly:
3) The equations defined for ΔVC,out apply to the ideal capacitor. Cout therefore defines the minimum capacitance to meet the ripple voltage requirement. The actual voltage ripple will be higher due to the parasitic inductance ESL (equivalent series inductance) and ESR (equivalent series resistance) of the capacitor.
Frequently Asked Questions about Boost Converter Design
A boost converter, also called a step-up converter, is a DC-DC power supply topology that increases the input voltage to a higher output voltage. It uses an inductor, diode, switch, and capacitor to achieve this conversion efficiently.
You should use a boost converter when your application requires an output voltage higher than the available input voltage, such as powering 12V circuits from a 5V source.
Key design factors include selecting the correct inductor value and current rating, choosing input and output capacitors with proper ESR and ripple current handling, and ensuring PCB layout minimizes EMI and parasitic loops. Additional considerations include efficiency optimization (choice of diode vs. synchronous rectification, MOSFET selection), protection features, and the control strategy (pure CCM vs. CCM/DCM operation).
Boost converters generate discontinuous output currents and fast switching transitions, which can cause both differential-mode and common-mode interference. Proper filtering and PCB layout are essential to reduce EMI.
Simulation tools such as Würth Elektronik’s REDEXPERT can be used to optimize inductor and capacitor selection based on ripple current, ESR, and switching frequency requirements.
How to Design a Boost Converter Step by Step
- Define Input and Output Requirements
Specify input voltage, desired output voltage, maximum output current, and switching frequency. Example: 5V input, 12V output, 0.5A load, 500kHz switching.
- Calculate Duty Cycle
Use the formula D = 1 – (Vin / Vout) to determine the duty cycle. This defines the switch on/off ratio.
- Select the Inductor
Choose an inductance value that maintains the desired ripple current factor. Ensure the inductor’s rated current and saturation current exceed calculated RMS and peak currents with margin.
- Choose the Input Capacitor
Select a capacitor with low impedance at the switching frequency and sufficient ripple current rating to stabilize the input voltage.
- Choose the Output Capacitor
Calculate the minimum capacitance required to keep voltage ripple and load step droop within limits. Ensure ESR is low enough to meet ripple requirements.
- Optimize PCB Layout
Minimize the hot node area, use a solid ground plane, and place feedback resistors close to the regulator. Keep current loops as small as possible to reduce EMI.
- Validate with Simulation Tools
Use tools like REDEXPERT to simulate ripple, losses, and thermal behavior. Adjust component values as needed for efficiency and stability.